- 03-5820-1777平日10:00〜18:00
- お問い合わせ
[Vue.js]Vue.jsでSpringBootからAjaxでデータ取得
今回はSpringBootのアプリケーションを作成し、Vue.jsプロジェクトのアプリケーションからAjaxを使用してアクセスしてデータを取得するというサンプルを作成したいと思います。
Vue.jsプロジェクトをSpringBoot内に配置する方法も試してみたいと思います。
開発環境
Windows10 Enterprise
npm 8.1.2
node 16.13.2
Java11
SpringBootプロジェクト
プロジェクト作成
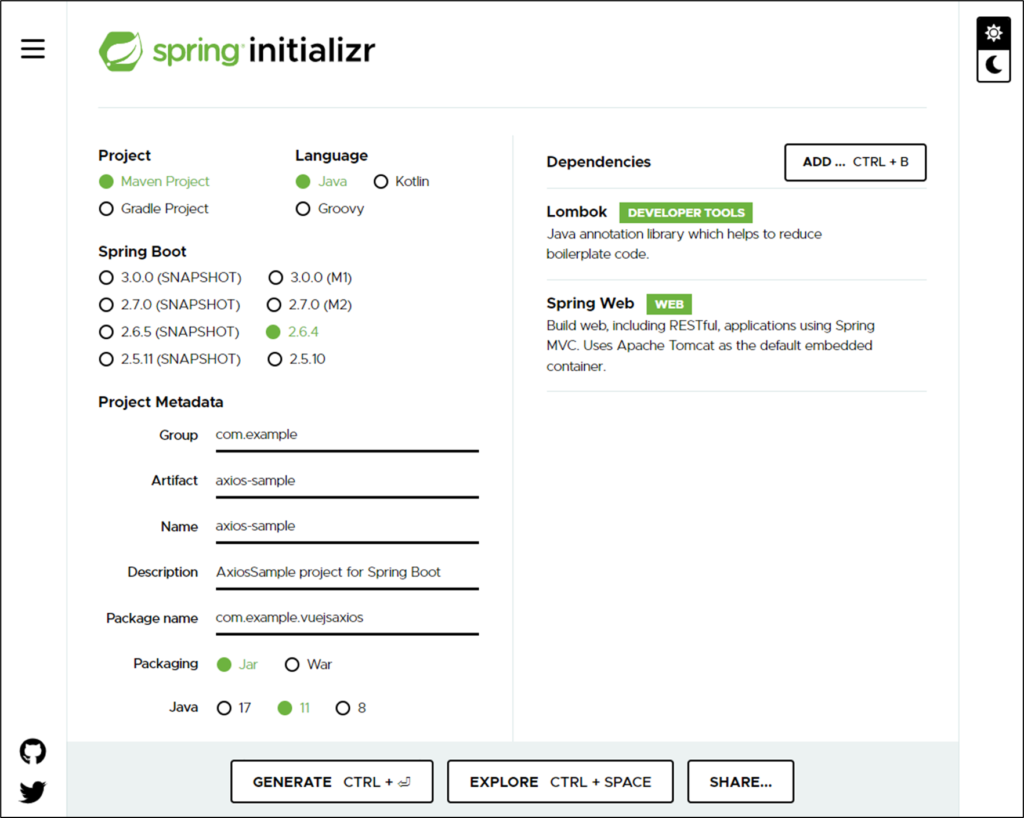
https://start.spring.io/でSpringBootプロジェクト作成(eclipse等の開発ツールで作成するのも可です)

LombokとSpring WebをDependenciesに加えます。
GENERATEボタンを押下したダウンロードしたファイルを解凍し適当なディレクトリに配置します。
コード実装
・ディレクトリ構成
axios-spring/
           ├─ src/
           ├─ main/
                      ├─ java/com/example/vuejsaxios/
                                                   ├─ ac/GoodsController.java ←作成する
                                                   ├─ VuejsaxiosApplication.java
                      ├─ resource/
                                ├─ static/
                                ├─ templates
                                ├─ application.properties
                ├─ test/
           ├─ target/
           ├─ HELP.md
           ├─ mvnw
           ├─ mvnw.cmd
           ├─ pom.xml
src/main/java/com/example/vuejsaxios/の下にacディレクトリを作成。
acディレクトリにGoodsController.javaを作成します。このクラスがAjax通信を受信するRestControllerになります。
・GoodsController.java
package com.example.vuejsaxios.ac;

import org.springframework.web.bind.annotation.RequestMapping;
import org.springframework.web.bind.annotation.RequestMethod;
import org.springframework.web.bind.annotation.RestController;

@RestController
@RequestMapping("/goods")
public class GoodsController {

    /**
     * 商品情報リストを取得
     * @return
     */
    @RequestMapping(value = "/list", method = RequestMethod.GET)
    public Goods[] getGoodsList() {  ①

    	Goods[] goodsList = new Goods[5];
    	goodsList[0] = new Goods("GB0001", "JavaScript入門", "本");
    	goodsList[1] = new Goods("GB0002", "Java SE Silver問題集", "本");
    	goodsList[2] = new Goods("GB0002", "AWSコンテナ設計", "本");
    	goodsList[3] = new Goods("GG0002", "エルデンリング", "ゲーム");
    	goodsList[4] = new Goods("GG0002", "スプラトゥーン2", "ゲーム");

        return goodsList;
    }

    /**
     * 商品情報クラス
     */
    private class Goods{ ②
        private String code;
        private String name;
    	  private String category;

    	public Goods( String code, String name, String category){
    		this.code = code;
    		this.name = name;
    		this.category = category;
    	}

        public String getCode() {
            return code;
        }

        public void setCode(String code) {
            this.code = code;
        }

        public String getName() {
            return name;
        }

        public void setName(String name) {
            this.name = name;
        }

    	public String getCategory() {
            return category;
        }

        public void setCategory(String category) {
            this.category = category;
        }
    }
① メソッドを作成します。商品情報の配列を返すRESTメソッドです。URLは「/goods/list」で呼ばれます。
② 商品情報を管理するGoodsクラスを定義します。
ビルド・起動
準備が出来たのでSpringBootを起動して正常に動作するかブラウザでアクセスしてみたいと思います。
axios-springディレクトリに移動し次のコマンド実行
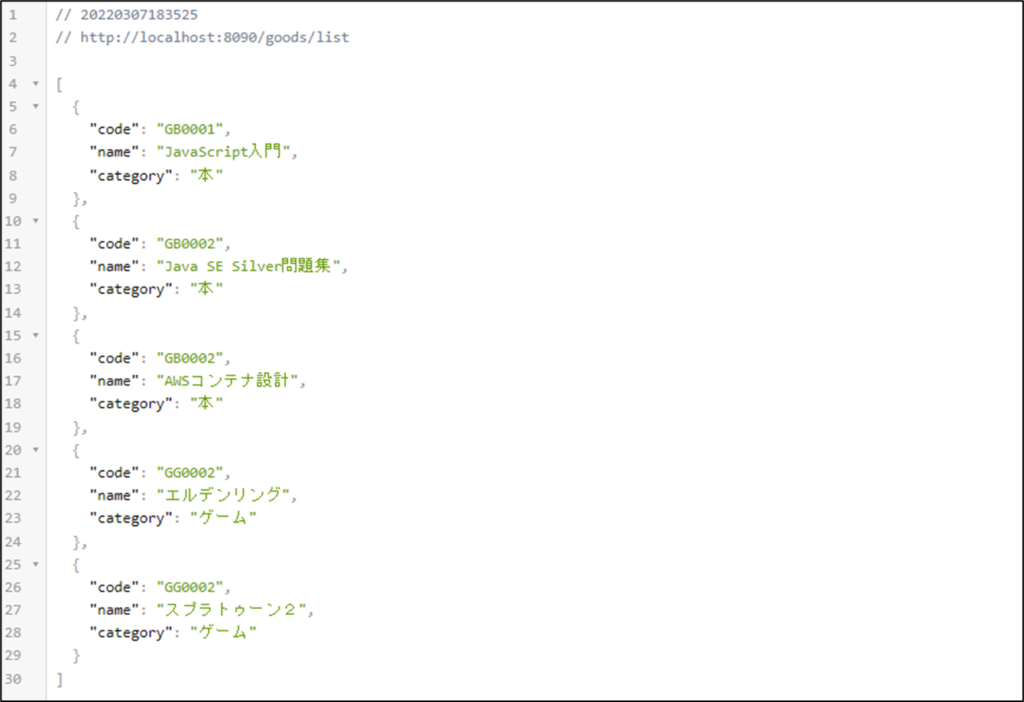
./mvnw clean spring-boot:run起動したらブラウザでhttp://localhost:8080/goods/listにアクセス
以下の様な情報が表示されたら正常に実行されています。

Vue.jsプロジェクト
プロジェクト作成
プロジェクト作成コマンド
vue create axios-sampleプロジェクト種別選択
#今回は Default (Vue 3) ([Vue 3] babel, eslint)を選択

? Please pick a preset: (Use arrow keys)
> ss ([Vue 3] node-sass, babel, router, eslint)
  router-sample ([Vue 2] babel, router, eslint)
  vuex-sample ([Vue 2] babel, router, vuex, eslint)
  Default ([Vue 2] babel, eslint)
  Default (Vue 3) ([Vue 3] babel, eslint)
  Manually select features
プロジェクト作成後、プロジェクトディレクトリに移動して次のコマンド実行
npm install --save axios実装
・ディレクトリ構成
axios-sample/
           ├─ node_modules/
           ├─ public/
           ├─ src/
                ├─ App.vue
                ├─ main.js
           ├─ assets/
                            ├─ style.css ←作成
                ├─ components/
                            ├─ GoodsList.vue ←作成
           ├─ babel.config.js
           ├─ package.json
           ├─ package-lock.json
           ├─ README.md
・main.js
import { createApp } from 'vue'
import App from './App.vue'
import css from './assets/style.css'

const app = createApp(App)
app.use(css)
app.mount('#app')
今回少し見栄えを良くするためスタイルシートを使用しているので、その部分の記述を追加しました。
・App.vue
<template>
  <GoodsList/>
</template>

<script>
import GoodsList from './components/GoodsList.vue'

export default {
  name: 'App',
  components: {
    GoodsList
  }
}
</script>

<style>
...省略
</style>
GoodsList.vueコンポーネントをインポートして表示する。
・GoodsList.vue
<template>
		<div class="th-sticky_wrap">
			<table class="st-tbl1">
				<thead>
					<tr>
						<th>コード</th>
						<th>名称</th>
						<th>カテゴリ</th>
					</tr>
				</thead>
				<tbody>
					<tr v-for="(goods) in goodsList" v-bind:key="goods.code"> ①
						<td>{{ goods.code}}</td>
						<td>{{ goods.name }}</td>
						<td>{{ goods.category }}</td>
					</tr>
				</tbody>
			</table>
		</div>

</template>

<script>
import * as axios from 'axios' ②

export default {
  components: {
  },
  name: 'GoodsList',
  data: () => ({
	  goodsList: [] ③
	}),
  mounted () {
	  axios.get('/goods/list') ③
       .then(response => {
          this.goodsList = response.data
     })
  }
}
</script>
① 下記の<script>の部分で定義している配列の変数をループして表示しています。変数のプロパティはAjaxで取得
したプロパティ名を指定します。
② Ajax通信用のクラスをインポートします。
③ 表示する配列の変数を定義します。
④ Ajax通信をして取得したデータを③で定義した変数に代入しています。
SpringBoot内にVue.jsプロジェクト配置
Vue.jsプロジェクトビルド
SpringBoot内にVue.jsプロジェクトを配置するのはビルドをする必要があります。以下のコマンドを実行します。
npm run build※Windowsでビルドが上手くできなかった場合はPowerShellのVersionを7以上にしてやって見て下さい。
ビルドに成功するとdistディレクトリが作成されます。
ビルド後Vue.jsプロジェクト配置
ビルドしたdistディレクトリ以下のファイル・ディレクトリをSpringBootの「src\main\resources\static」以下に
コピーしてください。
SpringBootビルド・起動
起動
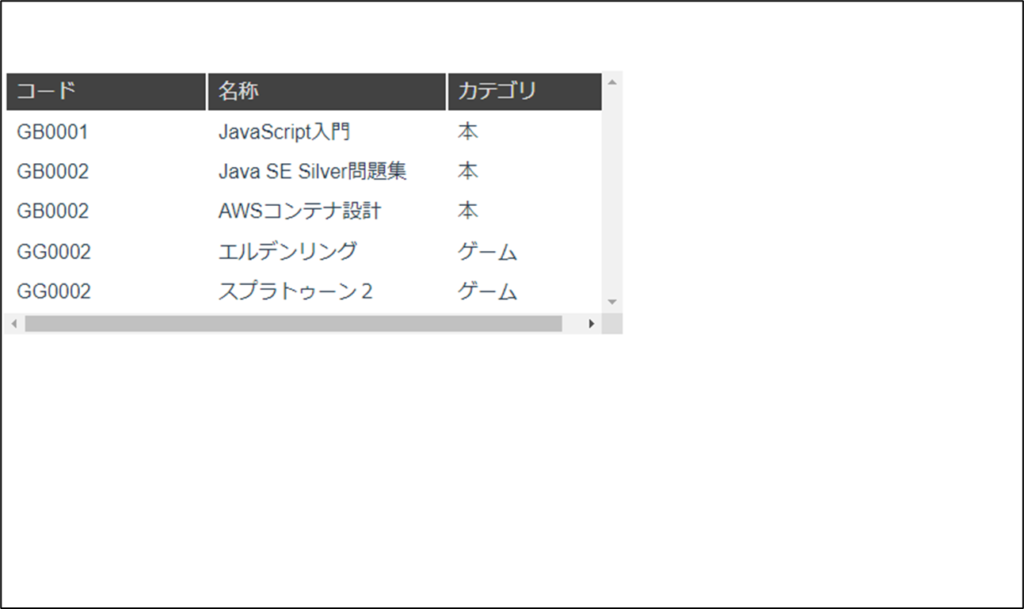
./mvnw clean spring-boot:run起動したらブラウザでhttp://localhost:8080/にアクセス。次の画面が表示されたら成功です。

以上、Vue.jsでSpringBootからAjaxでデータ取得するサンプルの説明でした。
非常に簡単にAjax通信が可能で、Vue.jsを使用すると表示も簡単にできることが分かります。
今回使用したサンプルを此方から取得できます。よろしければ試して見て下さい。
